Connect your Bitunix futures account to TraderWaves
Bitunix Connection Guide
Table of Contents
Understanding Bitunix Account Types
Spot vs Futures Accounts
Before connecting your Bitunix account to TraderWaves, it's important to understand the difference between spot and futures trading accounts:
Spot Trading: In spot trading, you buy and sell cryptocurrencies at their current market price. You own the actual cryptocurrency and can withdraw it to your wallet. Spot trading is straightforward - you buy low and sell high.
Futures Trading: Futures trading involves contracts that allow you to speculate on the future price of cryptocurrencies. You don't own the actual cryptocurrency, but rather a contract that represents it. Futures trading offers leverage, allowing you to control larger positions with less capital, but also comes with higher risk.
Why This Matters for TraderWaves: TraderWaves currently supports futures accounts only from Bitunix. This means you can only connect and import trade data from your Bitunix futures trading account. If you have both spot and futures accounts, make sure you're connecting the futures account that contains the trades you want to analyze in TraderWaves.
What Are API Keys?
Understanding API Keys
API (Application Programming Interface) keys are like digital credentials that allow applications to securely communicate with each other. Think of them as a username and password combination, but specifically designed for program-to-program communication.
For Bitunix and TraderWaves:
• API Key: This is like your username - it identifies your account to TraderWaves
• Secret Key: This is like your password - it proves that you authorize TraderWaves to access your data
Security Note: When you provide these keys to TraderWaves, we only request read-only access. This means TraderWaves can import your futures trade history and account data, but we cannot and will never place any trading actions on your account. Your funds and trading decisions remain completely under your control.
Step 1: Navigate to API Management
To create API keys for TraderWaves, you'll need to access the API Management section in your Bitunix account:
1. Log into your Bitunix account at bitunix.com
2. Look for your profile icon in the top-right corner of the screen
3. Hover over your profile icon to open the dropdown menu
4. Click on "API" from the dropdown menu options
5. This will take you to the API Management page where you can create and manage your API keys
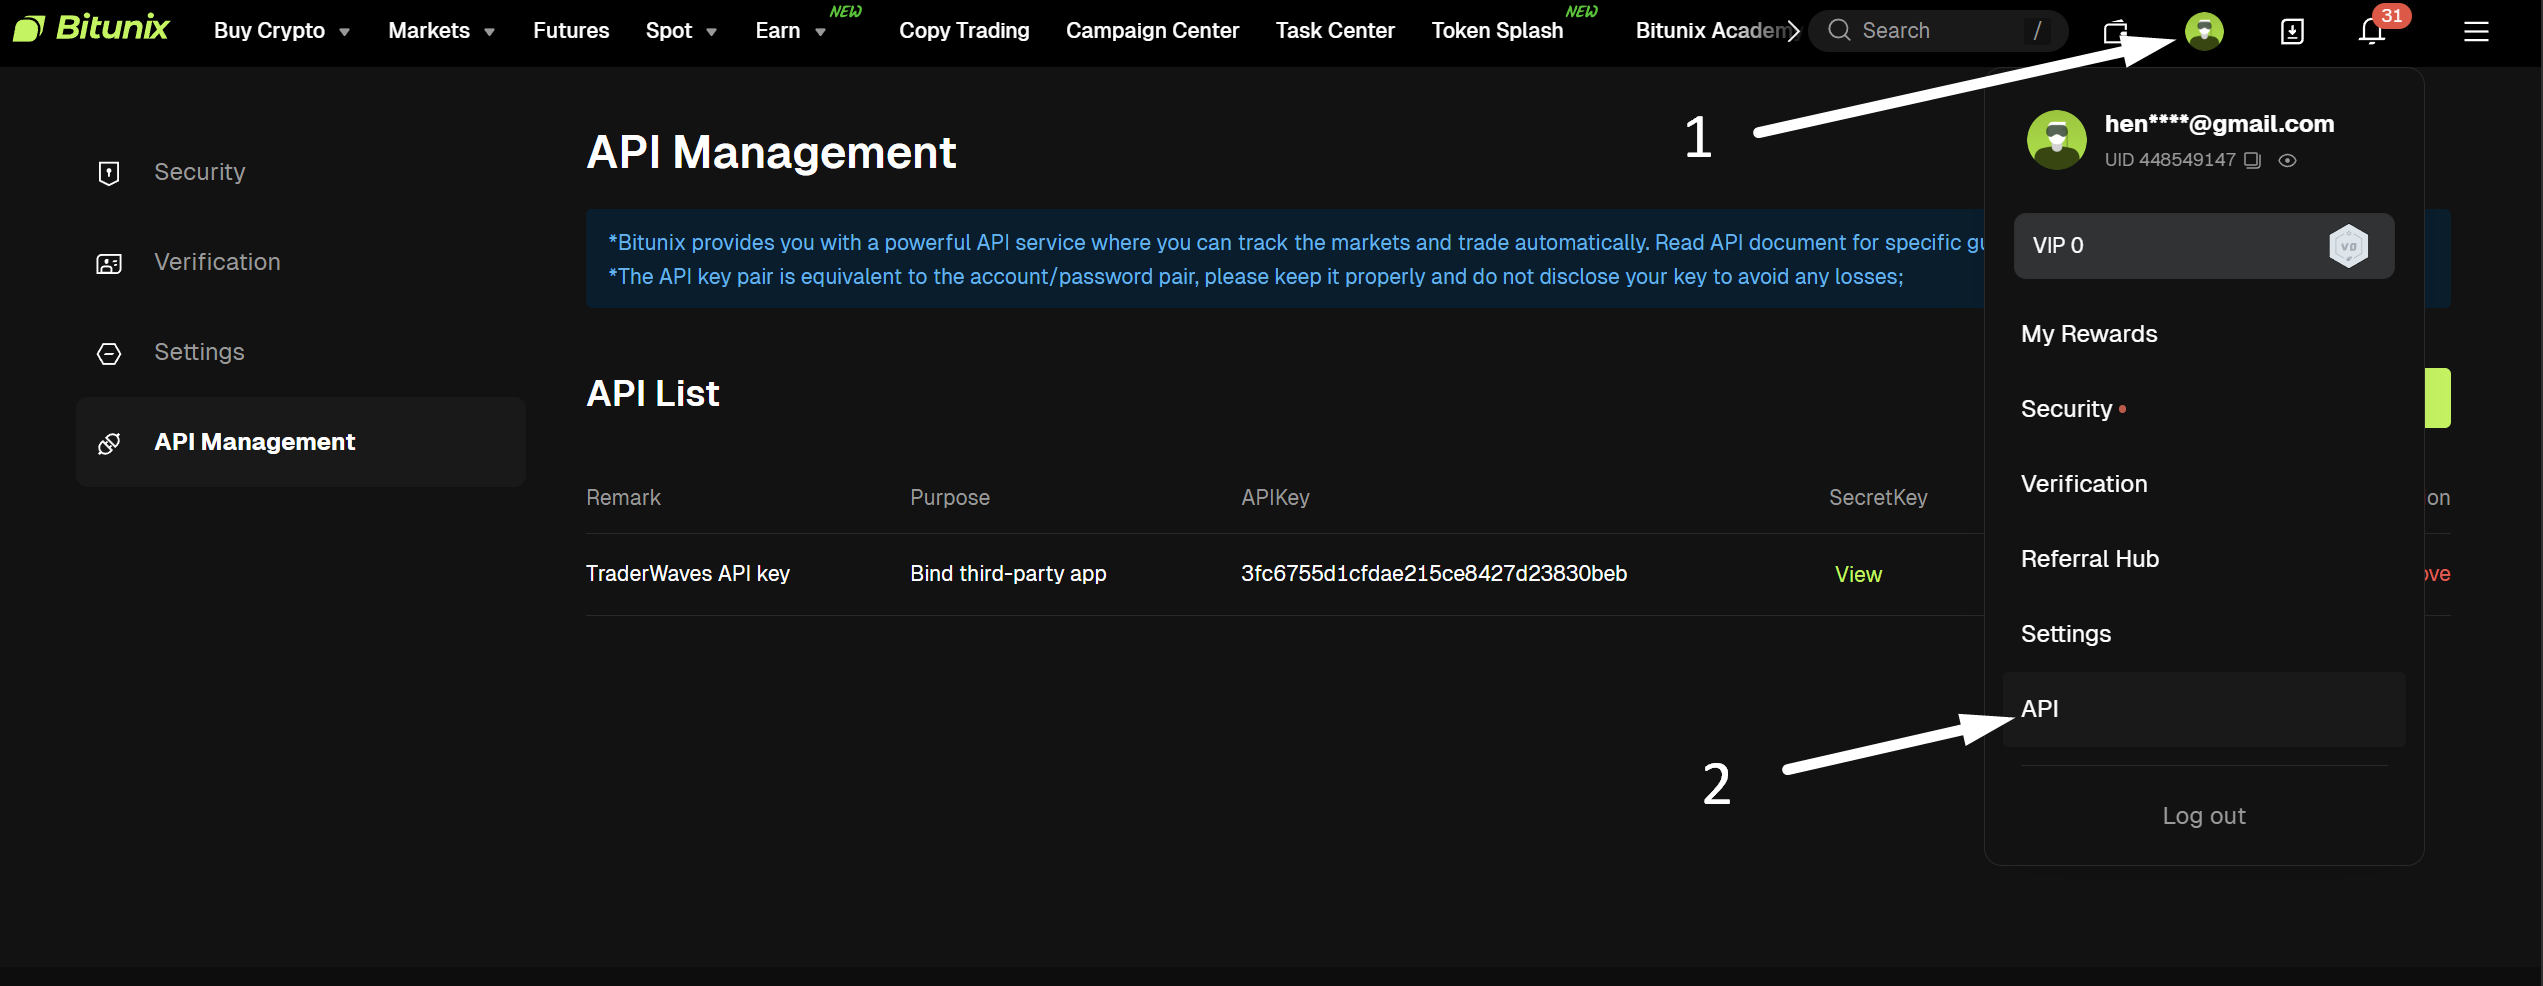
Fig 1: Navigate to API Management through the profile dropdown menu
Step 2: Create API Key
Once you're on the API Management page, you'll need to create a new API key specifically for TraderWaves:
1. Look for the "Create API" or "Create API Key" button and click it
2. You'll be presented with a form to configure your new API key
3. In the "Note" field, enter: TraderWaves API Key (this helps you identify the key later)
4. For the "Purpose" section, select: Bind third-party app
5. For "Permission", select: Read-only
Important Security Information:
The "Bind third-party app" purpose with "Read-only" permissions is specifically designed for applications like TraderWaves. This configuration ensures that:
• TraderWaves can only read your futures trade data and account information
• TraderWaves cannot place any trades or modify your account settings
• Your funds and trading decisions remain completely under your control
• The connection is secure and follows Bitunix's security best practices
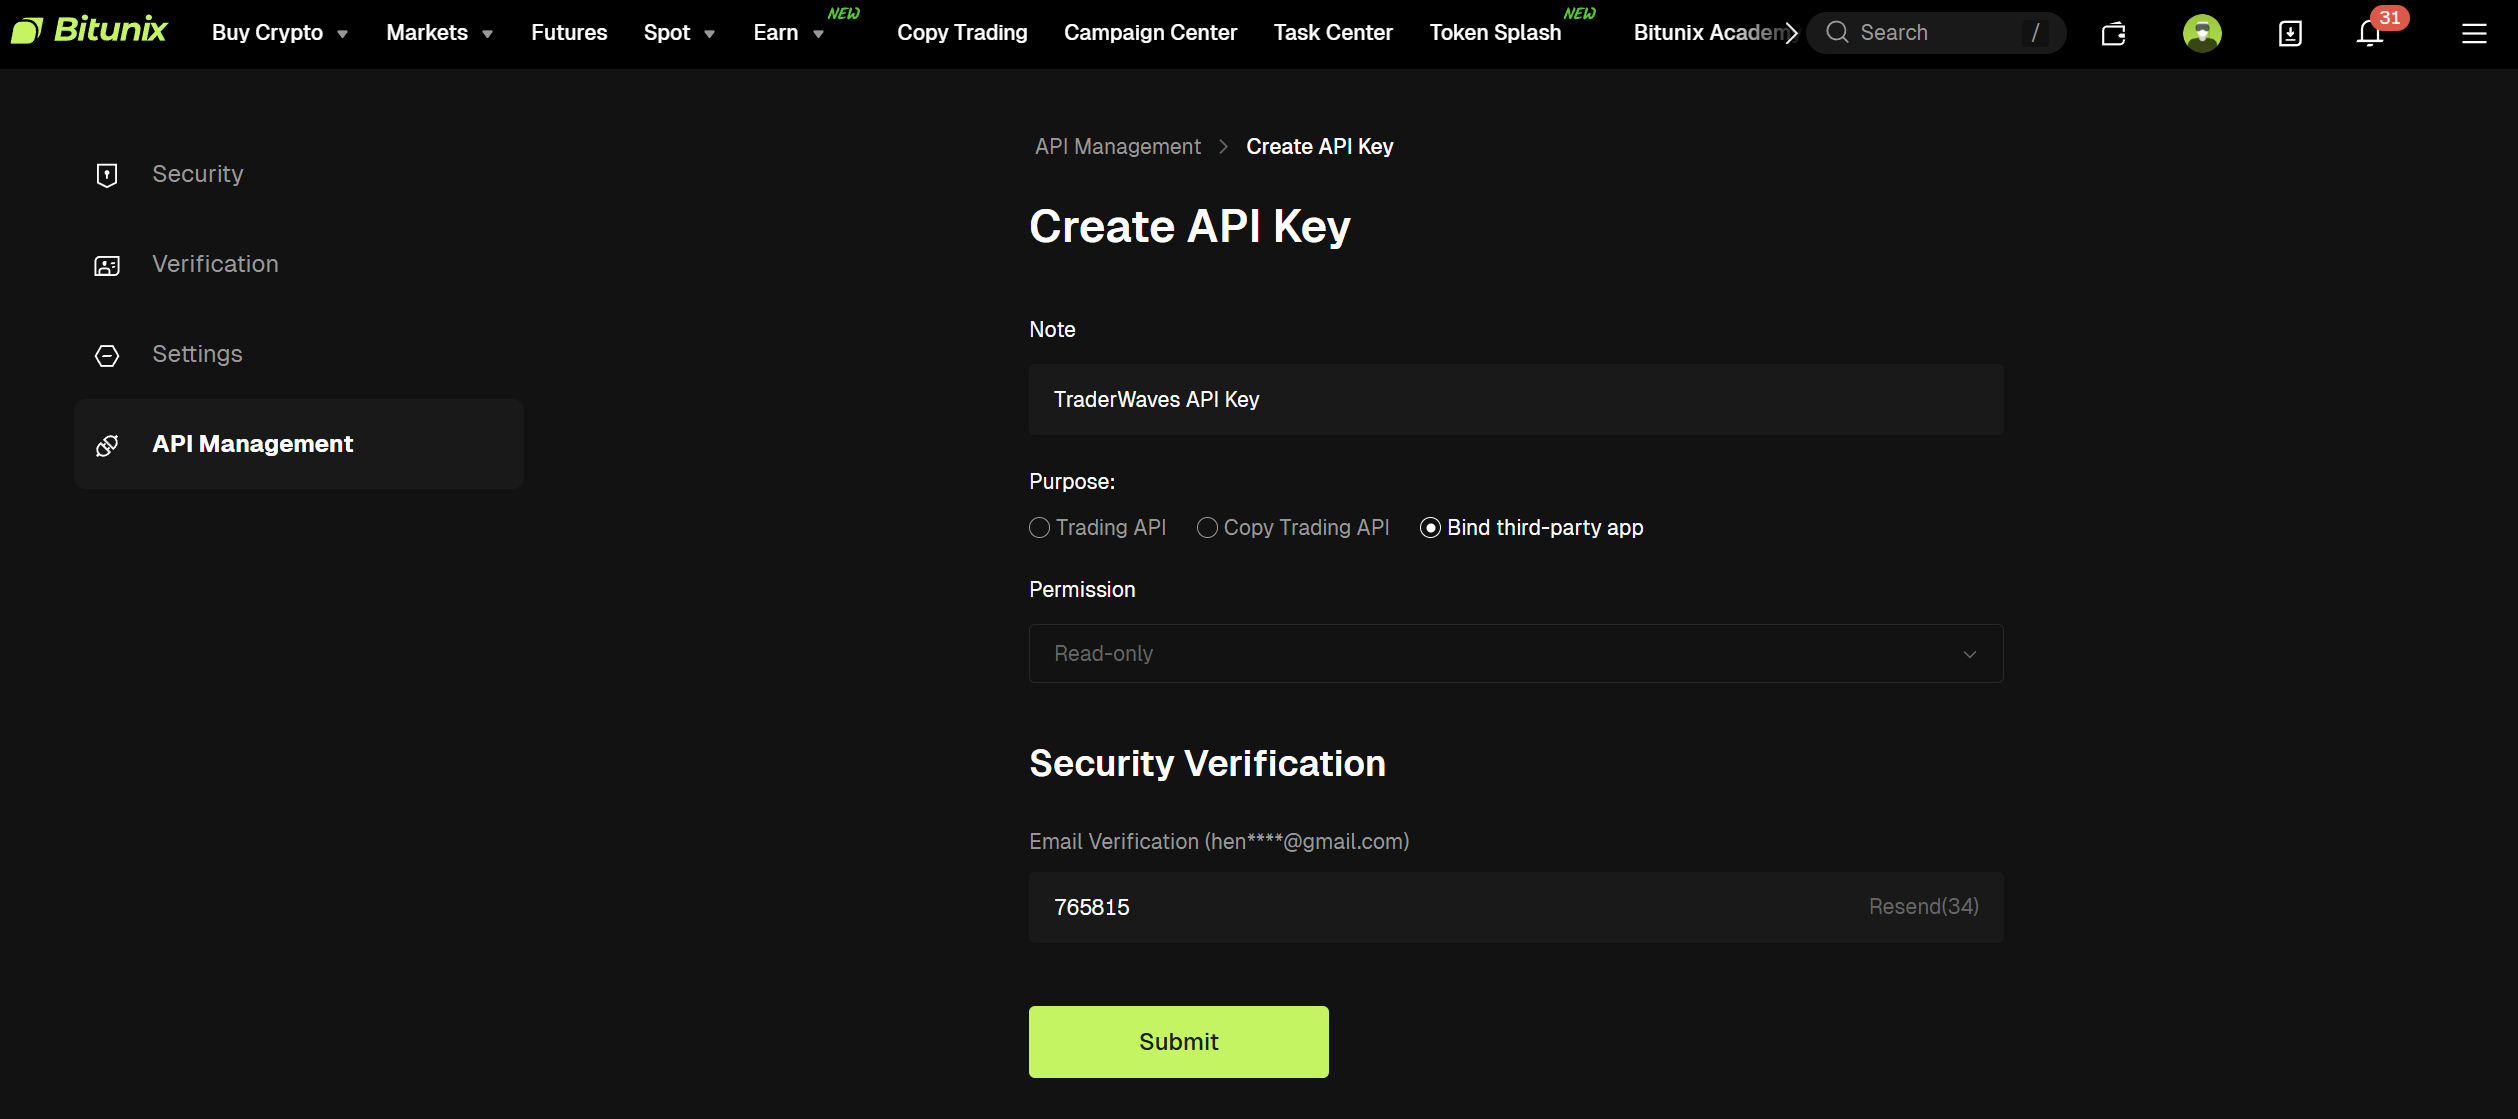
Fig 2: Configure your API key with the correct settings for TraderWaves
Step 3: Complete Security Verification
Before Bitunix will generate your API keys, you'll need to complete a security verification step:
1. After filling out the API key form, click "Submit"
2. Bitunix will send a verification code to your registered email address
3. Check your email for the verification code
4. Enter the verification code in the provided field
5. If needed, you can click "Resend" to get a new code
6. Once verified, Bitunix will generate and display your API keys
Step 4: Copy Your API Keys
After successful verification, Bitunix will display your API keys. You'll need to copy both keys:
Two Keys Required:
1. API Key: A long string of letters and numbers (e.g., 70261334116af1685e03173eabb18a96)
2. Secret Key: Another long string of letters and numbers (e.g., a722e56a207d82c98c26a5343d878db0)
Important:
• Copy both keys exactly as shown - they are case-sensitive
• Store these keys securely - you won't be able to see the Secret Key again after leaving this page
• If you lose your Secret Key, you'll need to delete the old API key and create a new one
• Use the copy buttons next to each key to ensure you get the complete key without any extra spaces
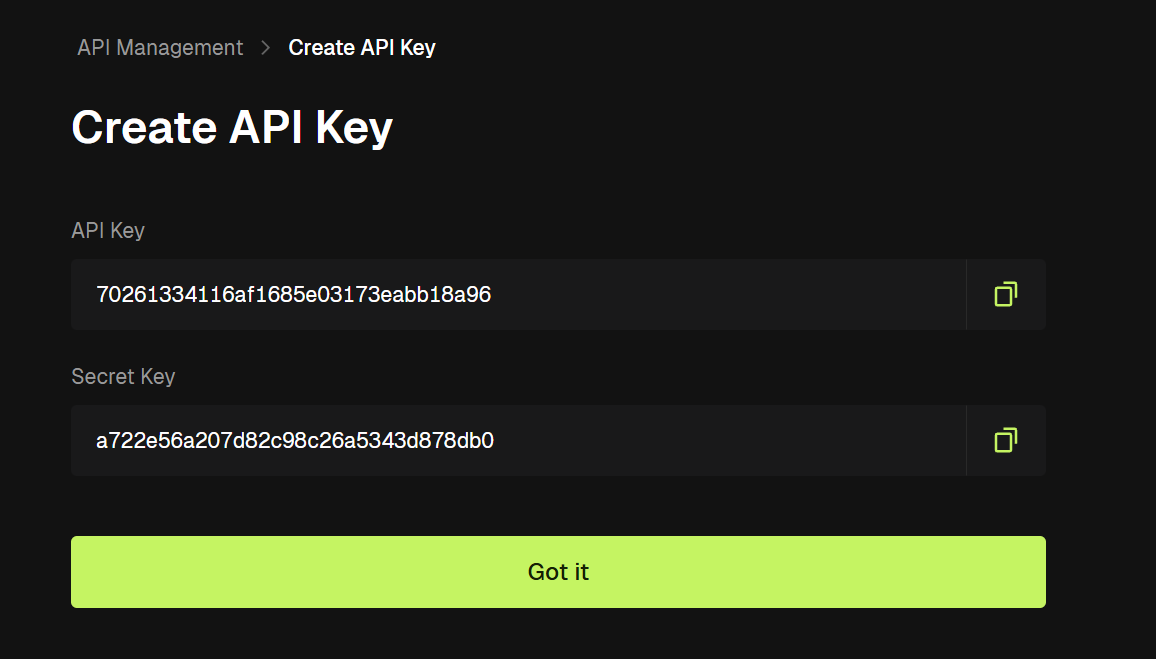
Fig 3: Copy both your API Key and Secret Key for use in TraderWaves
Step 5: Connect to TraderWaves
Now that you have your API keys, it's time to connect your Bitunix account to TraderWaves:
1. Log into your TraderWaves account
2. Click "Add Account" from your dashboard
3. From the list of supported platforms, select Bitunix
4. Enter your API Key in the first field
5. Enter your Secret Key in the second field
6. Click "Confirm" to complete the connection
What Happens Next:
• TraderWaves will verify your API keys with Bitunix
• If successful, your account will be connected and syncing will begin
• Your trade history will start importing automatically
• You'll see your Bitunix account listed in your TraderWaves dashboard
Troubleshooting:
If the connection fails, double-check that:
• Both API keys are copied correctly without extra spaces
• The keys are from a "Read-only" API key with "Bind third-party app" purpose
• Your Bitunix account is active and not restricted
Verification and Next Steps
Verifying Your Connection
Once connected, you can verify that everything is working correctly:
1. Check Your Dashboard: Your Bitunix account should appear in your TraderWaves dashboard
2. Review Trade Data: Your recent futures trades should start appearing in your trade journal
3. Monitor Sync Status: Look for any sync indicators showing that data is being imported
What TraderWaves Will Import:
• Futures trade history and performance data
• Account balance and equity information
• Open futures positions (if any)
• Trading statistics and metrics from your futures account
Security Reminder:
Remember that TraderWaves only has read-only access to your futures account. We cannot:
• Place any trades on your behalf
• Withdraw funds from your account
• Modify your account settings
• Access your personal information beyond futures trading data
Need Help?
If you encounter any issues during the connection process:
• Check our Help Center for additional troubleshooting guides
• Contact our support team at info@traderwaves.com
• Join our Discord community for real-time assistance
Was this helpful?